

Table of Contents:
A mushroom incubator (or incubation chamber) is a dedicated, climate-controlled room designed specifically for the mycelium growth stage. Think of it as a 'nursery' for your mushroom blocks: its primary job is to maintain the perfect internal temperature and high CO2 levels needed for the mycelium to fully colonize the substrate.
In simple terms: A mushroom incubator is a dark, warm space with an active air circulation system that regulates the climate. It is where your oyster mushroom bags 'overgrow' with white mycelium, protected by a precisely managed environment.
To maintain a clean and professional environment, the incubator room must be properly finished.
✅Avoid lime. Lime creates rough surfaces and cracks where moisture accumulates and mold multiplies. Instead, use a cement-based plaster to make the walls smooth, and finish them with white water-based facade paint. This type of paint is moisture-resistant and easy to clean.
A concrete floor is essential. Ideally, it should have a slight slope leading to a drainage groove. This allows you to wash the entire room easily with a hose or a high-pressure cleaner (like a Karcher).
💡Layout Tip: If you produce your own substrate, position the incubator so it is accessible directly from the inoculation room to minimize contamination risks.
At my facility, the incubator door led directly to the yard, where we transported mature batches for cultivation. To keep the climate stable, we installed a dedicated transfer window next to the door for moving bags. We kept it covered with styrofoam and only opened it when necessary.
It’s worth noting that you don’t actually need windows in an incubator, as mushroom blocks grow best in total darkness.
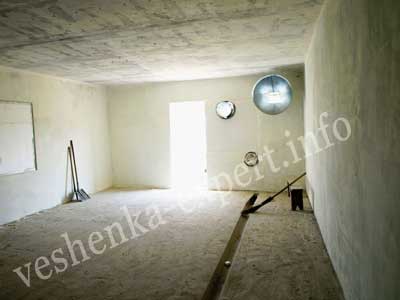
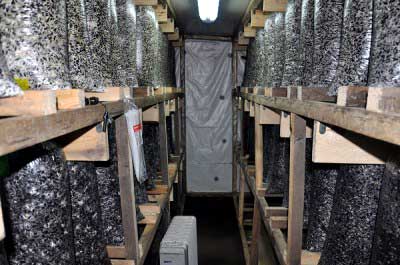
Transfer Port: To the right of the doorway, you can see a round opening specifically for transferring blocks.
Air Intake: The iron pipe at the top (with the expanding trumpet end) is where we attached the polyethylene air duct. A centrifugal 'snail' fan is located outside to power the system.
Recirculation: To the left of that pipe, near the ceiling, is a round recirculation hole that connects back to the fan system outside.
Drainage: On the floor, you can see the drainage groove designed for easy cleaning and humidity management.
A professional incubator should be well-insulated from the outside.
Why it works:
Once you heat the room, the walls act as a thermal buffer. If there is a sudden cold snap outside, the warm walls will radiate heat back into the room for some time, keeping the climate stable.
If you use a two-zone growing system, your incubator is a dedicated room designed solely for mycelium growth.
▶️Since mushrooms aren't fruiting here yet, you don’t need to worry about airflow hitting every single cluster. This allows you to place blocks much more tightly to save on space and heating costs.
💡If you live in a warm climate, be careful with high density. While you can place blocks closer together than in the grow room, you must ensure your ventilation is strong enough to reach every bag. Proper airflow is essential to prevent the substrate from overheating during incubation.
✅Calculation Rule: Your incubator should be large enough to hold as many bags as you produce in 15–17 days (the average time for the substrate to mature and show primordia).
If saving on heating costs is your priority, high-density placement is the way to go. However, you must find a balance: while you want to keep the room warm, you must also ensure enough airflow to prevent the core of the substrate from overheating.
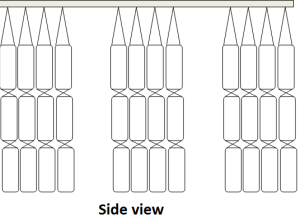
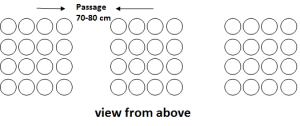
In these passages, poly air ducts with nozzles (or perforations) are installed to ensure uniform heat removal and stable humidity throughout the entire room.
💡However, if your substrate isn't prone to overheating, you can opt for a simplified setup: placing several low-power axial fans in the aisles to maintain gentle air circulation and mixing.
If you have a solid concrete ceiling or powerful beams, you can hang bags directly using hooks.
If the ceiling is flimsy, you can build a goal-post style metal frame (or an H-frame) anchored to the floor and walls.
 The "C-Hook" System:
A rope is tied to an upper pipe, and bags are secured using simple C-shaped metal hooks (see photo).
This is one of the fastest ways to load and unload a room.
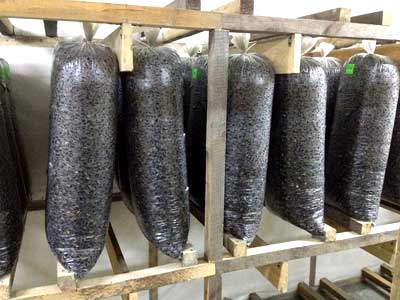
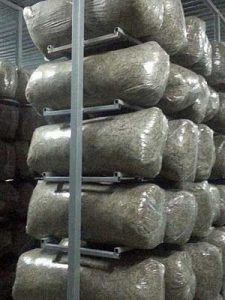
If you are working with small blocks (up to 3 kg/7 lbs), such as those processed in an autoclave or pressure cooker, racks are the most effective method.
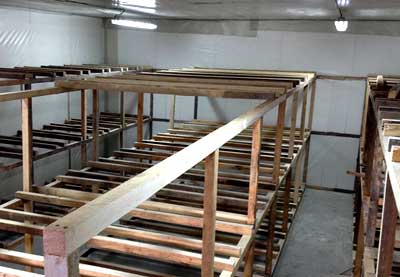
And here is the same design of a rack in an incubator for 900 blocks:

Some growers stack blocks horizontally on top of each other in the incubator.
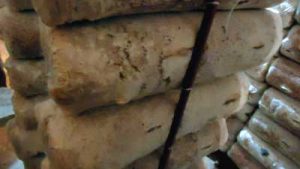 ⚠️Be very careful!
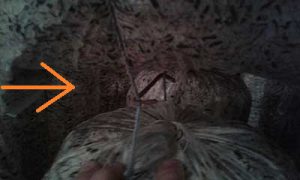
If blocks touch without an air gap, the temperature in those spots can spike to 35–40°C (95–104°F). This "burns" the mycelium or causes stroma (a thick, unproductive white skin under the film), as shown in the photo.
Always place spacers (at least 5 cm high) between stacked blocks to allow heat to escape.
The primary goal of ventilation in an incubator is not fresh air, but heat removal.
For an effective setup, I recommend a ceiling height of at least 3.5 meters (11.5 feet). This extra vertical space makes it much easier to install, access, and maintain your ventilation ducts and equipment.
When designing your ventilation system, keep these three critical safety limits in mind:
Core Temperature Control: To prevent mycelium death, the temperature at the center of the block must never exceed 32–33°C (90–91°F).
Perforation Protection: You must balance your airflow so that the perforation slits do not dry out. This happens if the humidity is too low or if the air velocity hitting the bags is too high.
Temperature Gradient: he difference between the core of the block and the layer just under the plastic film should stay within 7–8°C (13–14°F). A larger gap often leads to heavy condensation and bacterial issues.
💡The core principle of ventilation in the incubator is identical to that of the fruiting chambers.
📌Read more about ventilation here.
The system operates by collecting air through a recirculation duct and mixing it with fresh air from an intake pipe of the same diameter.
This air mixture is then processed in a specific sequence:
first, it passes through a heat exchanger or chiller (cooler, pad cooling), then through a humidifier, and finally, the fan pushes the treated air into the central distribution duct.
 Never blast cold outside air directly onto the blocks. If the film cools too fast while the center of the block is still hot, heavy condensation will form under the plastic, leading to bacterial issues.
In a farm producing more than 2 tons of mushrooms per month, having at least three separate incubators is ideal.
Batch Integrity: It’s much easier to manage the climate when all blocks in a room are the same age.
Sanitation: When one room is emptied, you can perform a thorough chemical cleaning before the next batch arrives—something that is impossible in a single, large "forever-full" room.
Emoji guide: 📌 link | ✅ advice | ▶️ fact | 💡 important | ⚠️ warning