

When oyster mushrooms fail to grow properly, many growers are quick to blame the grain spawn. Sometimes they're right — but not always. In this article, we’ll look at how to assess the spawn’s quality, choose a reliable supplier, and when the real problem might lie elsewhere.
✅  Before placing an order, it’s worth asking a few key questions:
Some growers compare spawn from two suppliers by inoculating the same substrate and observing which performs better. While this seems logical, it doesn’t tell the whole story.
One strain might colonize the substrate aggressively but delay pinning. Another may grow more slowly but fruit reliably. What looks like poor performance may just be a different growth pattern.
If your substrate or growing conditions favor one strain over another, results may vary regardless of spawn quality.
▶️For example, one of the strains may be more sensitive to excessive CO2 levels, or the temperature and/or humidity in your growing room may be unsuitable for it.
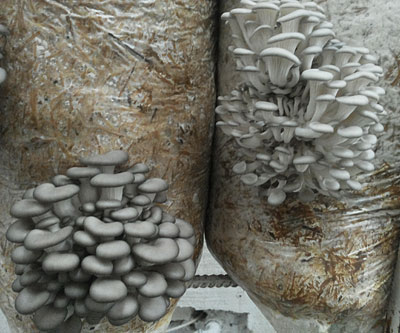
In this photo, it is clearly visible that the cluster on the right is suffering from excessive CO2 levels — it has elongated stems and thin caps. The block on the left is colonized by a different strain, and the room conditions are more suitable for it — the caps are firm, there are many mushrooms, and the stems are only slightly elongated, and only on the top mushrooms.
Pasteurizing with hot water or steam can lead to uneven moisture levels. Bottom or side layers might get waterlogged. This creates anaerobic zones, where mold or bacteria thrive.
If you inoculate these blocks with one supplier’s spawn and the better substrate with another, your results will be skewed.
If the large polypropylene bags used for thermal or lime pasteurization aren’t fully submerged, the top part of the substrate may remain under-treated. This can lead to contamination and poor colonization. These blocks often rot — and the spawn gets blamed unfairly.
If you're confident in your substrate preparation and incubation process, here’s how to do a fair spawn test:
✅ Use spawn of the same strain from different suppliers.
✅ Inoculate in alternating order and clearly label each block
To compare different suppliers fairly, alternate their spawn during inoculation. Start with a packet from supplier A, then use one from supplier B, then go back to A, and so on. This way, you minimize the effect of substrate differences between batches.
As you inoculate, label each block right away so they don’t get mixed up later. You can either write the supplier’s lab and strain name directly on the bag, or use color-coded stickers — for example, green for supplier A and red for supplier B.
This simple system will help you spot real performance differences — not random variation.
✅ Distribute blocks evenly in your incubation area to avoid location bias, as humidity and temperature may be unevenly distributed in your incubator.
✅ Use transparent bags for some of the blocks to monitor internal growth.
✅ Measure and record block temperatures daily during colonization.
Only with this method can you truly judge which spawn performs better.
Problems with fruiting can sometimes be caused by poor-quality spawn — but more often, they come from issues with substrate prep or environmental conditions. Choose your supplier wisely, monitor each stage of cultivation carefully, and test thoughtfully before assigning blame.
💡If the block is well colonized and pins (primordia) appeared on time, it means the spawn is not to blame for any subsequent poor growth or withering. You need to look for the problem in the environmental conditions of the growing room.
📌Read more about this here.
Emoji guide: 📌 link | ✅ advice | ▶️ fact | 💡 important