

Uneven colonization of oyster mushroom substrate is a common issue, especially during incubation. White, yellow, or dark spots on the block often worry growers, but not all of them mean contamination.
In this article, we’ll talk only about spots and poor colonization — not mold.
📌Mold deserves a separate discussion.
Problems with substrate overgrowth usually appear due to one or several of the following reasons:
▶️violations during heat treatment of plant-based raw materials (straw, sunflower husk, hay)
▶️use of low-quality grain spawn
▶️lack of a clean working area during inoculation
▶️incorrect incubation conditions
If the mycelium grows poorly and areas of non-growth appear, don’t rush to blame the spawn supplier. Uneven colonization can have many causes.
For example, a low incubation temperature — around 14–17 degrees Celsius (57–63 degrees Fahrenheit) — slows down the growth of oyster mushroom hyphae.
While the mycelium is growing slowly, bacteria feel quite comfortable at this temperature. They actively multiply in the space between the film and the substrate, especially where moisture accumulates.
As a result, dark or wet-looking areas may appear on the block.
📌Another common reason is impropert treatment of the raw materials.
We introduce a relatively large amount of grain spawn into the substrate, so oyster mushroom mycelium usually colonizes it quickly.
During this process, the mycelium suppresses many competing microorganisms — including bacteria and fungi — partly by releasing organic acids and other biologically active compounds.
We usually don’t notice this struggle at all. If the mycelium is stronger, competitors simply don’t develop, and everything looks normal.
But if the mycelium loses this competition, we start seeing visible signs: spots between the film and the substrate, or areas inside the block where colonization stops.
Now let’s look at the main types of spots and what they actually mean.
Spots on a mushroom block may indicate bacterial activity, moisture problems, or — less often — mold.
But there are also spots that are completely harmless.
Most spots fall into three categories:
▶️white,
▶️yellow or orange,
▶️dark
Let’s go through them one by one.
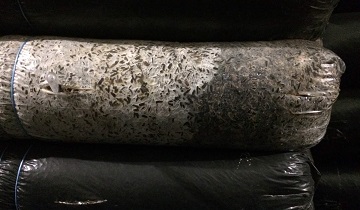
White spots are usually round and appear at the early stages of incubation. They are clearly visible against the dark background of straw or husk that hasn’t been colonized yet. Sometimes they can be noticed as early as the second or third day after inoculation.
These spots often form around individual grains of spawn.
Most likely, this is oyster mushroom mycelium growing in a loose, cobweb-like pattern. Why some grains behave this way and others don’t is hard to explain.
What’s important to understand: this does not characterize the grain spawn in any way — neither positively nor negatively.
If the raw material was properly processed, these white spots do not interfere with colonization at all. By day 6–7 of incubation, when the entire block turns white, these areas blend into the rest of the mycelium and become indistinguishable.
They also do not affect yield.
These spots should not be confused with stroma — a dense white crust formed by stressed mycelium.
That is a completely different phenomenon.
More details about the stroma here.
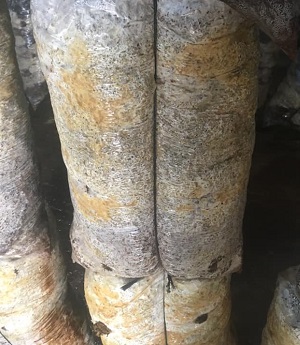
Yellow or orange spots are much more often associated with excess moisture.
Usually, these areas are wetter than the rest of the block. Sometimes they look jelly-like, sometimes more watery.
Yellow liquid in mushroom grow bag
Occasionally, you may notice small yellow, reddish, or brownish liquid spots under the film. In many cases, this is harmless — just excess moisture colored by pigments or mushroom metabolites.
This often happens due to condensation, especially during cooling.
📌These situations are discussed in more detail in separate article about block cooling and condensation.
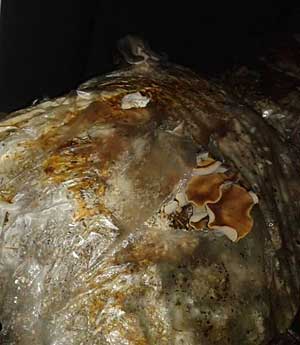
More often, however, yellow or orange areas indicate bacterial contamination caused by waterlogged substrate.
If you cut the film in such a spot, you’ll usually find a thick, slimy mass.
The liquid doesn’t flow — it looks more like jelly. These blocks often have an unpleasant smell: sour, sometimes alcoholic, or less commonly ammonia-like.
▶️This is a sign of waterlogged substrate.
On waterlogged substrate, oyster mushrooms often grow with deformed caps — wavy, curly, or irregular.
Pins may turn brown and sticky. If you gently squeeze them, drops of water may appear.
More about it.
Another reason for yellow areas of non-growth is sharp cooling during incubation.
If the temperature drops suddenly and no green mold appears, you may see yellow spots where the mycelium simply stopped growing.
To avoid yellow spots:
✅keep substrate moisture at an optimal level (about 68–69%)
✅maintain stable incubation conditions
✅avoid sudden temperature changes
 Sometimes, as colonization progresses, a clear boundary forms between white mycelium and darker substrate.
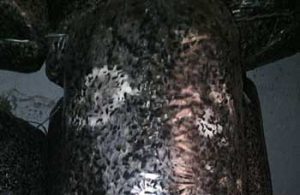
In other cases, the block colonizes normally at first, turns white, and then growth suddenly stops in certain areas, which begin to darken.
What prevents oyster mushroom mycelium from growing there?
Usually, microorganisms that find these local conditions more suitable.
Dark spots typically appear due to one or a combination of the following reasons:
Repeated use of water for heat treatment or lime solution for cold treatment.
If the container is not thoroughly cleaned after each batch of substrate.
💡Some growers believe that leftover water in the tank will be reheated during the next batch and all bacteria will die. Unfortunately, the opposite often happens: the most resistant microorganisms survive, adapt, and infect the next batch — sometimes leading to complete spoilage.
In some cases, small larvae can be found under the film in dark areas (see photo here).
They feed on the mycelium, stopping colonization locally.
If this happens:
✅infected bags should be removed immediately
✅the incubation room should be treated appropriately
⚠️Always use protective equipment when working with disinfectants or insect control products.
Not every spot on a mushroom block means mold.
But spots tell you about:
▶️moisture balance
▶️heat treatment quality
▶️incubation conditions
Learning to read these signals helps you fix problems early — before they affect yield.
Emoji guide: 📌 link | ✅ advice | ▶️ fact | 💡 important | ⚠️ warning